Preparing your chimenea for use
Ahead of using the chimenea, there are a few things to consider:
1-Positioning the chimenea
The first job when setting up your chimenea is to position it in an appropriate place. It should be placed somewhere on a flat, level surface. It should also be kept on a fireproof surface, such as a concrete or paved patio area – avoid leaving a chimenea on a wood decking as this might cause a fire hazard. It’s not a good idea to leave the chimenea on the grass either, as this can cause scorching when hot.
Also remember to keep the chimenea well away from fences and walls, and from overhanging branches or anything else that might catch fire easily.
 2-Seasoning or curing your chimenea

Next up, you’ll need to season or ‘cure’ the chimenea. For clay chimeneas, this process helps to prepare the material to withstand hot temperatures without cracking. For steel and cast iron chimeneas, seasoning helps to cure the paint which protects the metal from the heat.
The seasoning process is pretty simple – it effectively means just having a few smaller fires in the chimenea to begin with.
Layer some sand, gravel or lava (pumice) stones into the bottom of the chimenea. This will protect the bottom of the pit from the heat. You can add a couple of bricks on top to create a grate effect.
On top of this, add a small amount of kindling and firewood. Once lit and burning well, add a couple of slightly larger logs to the chimenea. Let these burn out naturally. Repeat this process for the first five or six fires, and then from there get gradually bigger. After nine or ten fires, the chimenea should be adequately sealed.
From then, you can use it as normal.
Building a fire in your chimenea
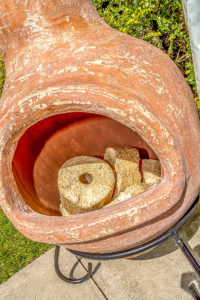
Firing up the chimenea isn’t as hard as you might think. In fact, there are a number of ways you can do it – and some remove all of the hassle completely. Firstly, ensure that your pit is lined with sand or lava stones to protect the bottom from the heat.
Then it’s time to add your fuel and get the fire going.

chimenea
3-The traditional way
Your first option is to add a layer of wood kindling, with some scrunched up balls of newspaper. You then light the newspaper and wait until the kindling catches alight, before adding more firewood gradually to build the fire.
4-Chimenea logs
12 pack
An environmentally friendly option, chimenea logs are made from recycled sawdust. They produce very little smoke and burn well. Simply add your logs to the pit, and use a couple of firelighters to get the fire started. Ocote firelighters are a perfect option here, as they are 100% made from natural pine wood and free from added chemicals. They smell great when burned too!
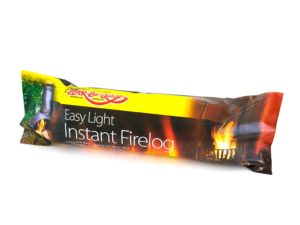
5-Easy light fire logs
Fire logs are a similar option to Instant Lighting / fire logs, although you don’t need firelighters to get them going. They are made of recycled wood particles which are bound together with wax. To light the fire, all you need to do is set first to both ends of the wrapper. Each log burns for up to three hours. The great thing about these fire logs is that they are smokeless.
7-Fire gel 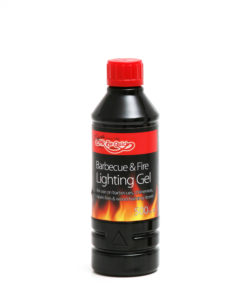
Finally, you can remove the hassle of using wood and logs by burning a fire gel in your chimenea. You can scoop the gel out of the tin to start a log fire, but the easier option is to simply place the tin in the pit, remove the lid and light the gel. This will flame and generate heat like a normal fire. The bonus here is that to snuff out the fire once you’ve had enough, you don’t need to wait for it to burn out – just carefully place the lid over the tin to extinguish the flame.
8-A warning: Don’t extinguish with water!
When you’re fire is flaming and you’ve had enough, don’t be tempted to extinguish it yourself. With the exception of fire gel which can be snuffed out by replacing the tin lid, it’s important to let your fuel burn out naturally.
Extinguishing with water can damage your chimenea by causing it to crack because of the sudden change in temperature.
9-Cleaning and maintaining your chimenea
To prolong the life of your chimenea, you should ensure it’s kept clean.
After use, allow sufficient time for the chimenea to cool down. Once it’s completely cool, remove any large bits of ash with a rake. You can then use a shovel to remove any other smaller pieces of ash.
If it comes with a lid, place this on top of the chimenea when it is not in use. This will prevent rain from dripping down into the pit. It’s also a good idea to cover the chimenea when you’re not using it, as this will help to protect it from the elements.
During the harsh winter, put the chimenea somewhere indoors if possible, such as a garage or shed. Be careful when moving the chimenea, as dropping it can cause it to crack – even if it’s a metal one.
If you’re using a cast iron or steel chimenea, check it regularly for signs of any rust. These can be touched up with a heat resistant paint to make sure your chimenea lasts.
10-Got an old chimenea?
If you’ve decided it’s time to replace your old chimenea, there are loads of options available for a new one. But what are you planning to do with the old one?
Don’t just bin it… You could actually make use of it as a quirky and fun garden feature. Why not bury half of the pit and leave some exposed, before planting some flowers in it? It’ll make a great focal point and offers something different to the standard flower pots you usually have.
Or how about fitting a pump and transforming the old chimenea into a water feature
Stay safe when using your chimenea
When you’re using your chimenea to create a cosy and welcoming garden, remember to keep it safe. Ensure it’s always on a flat surface, well away from anything flammable.
Also remember to keep your chimenea away from pets and young children, to avoid nasty accidents. Never try to move the chimenea while it’s hot or still flaming.
And finally, never burn toxic waste or chemicals in the chimenea; not only is it bad for the environment, it can also be bad for your health.